
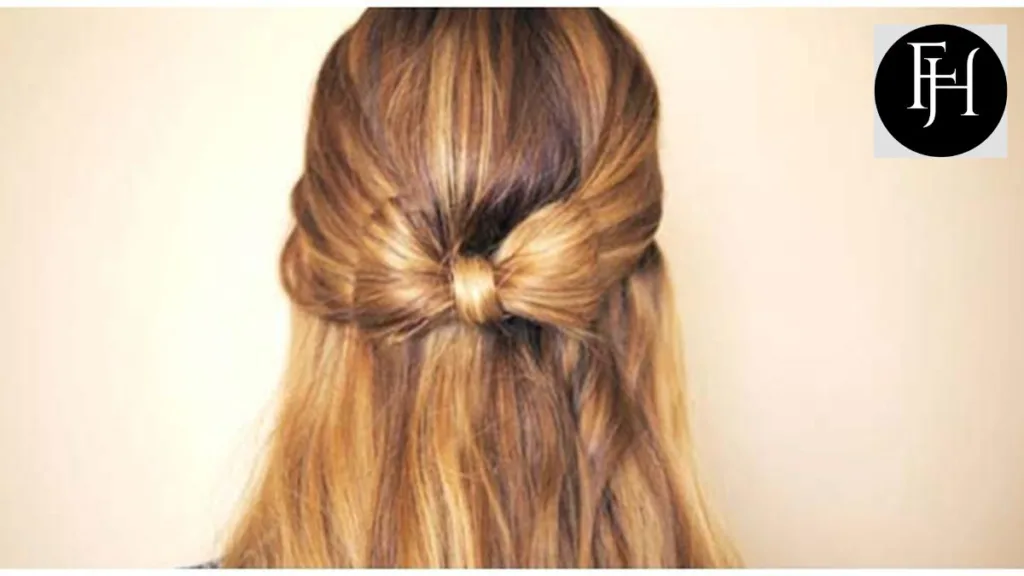
A bow tie hairstyle is a fun up do that mimics the look of a bow tie without needing an actual tie. It involves twisting sections of hair into knots and then wrapping the ends around and over to form the balanced shape of a bow.
Wonder no more, for learning How to do a bow tie hairstyle? is simpler than it seems. With just a few quick hair twists and wrapping techniques, you can fashion your own faux bow tie high in your hair. Beyond just a basic ponytail or bun, this charming updo brings flair and sophistication worthy of the finest black-tie events. All it takes is following some strategic steps to form the unmistakable shape gracing necklines everywhere.
The steps are simple yet effective – parting the hair, crossing one section over the other to create an “X”, twisting the strands away from the face, continuing the twist into a knot, then wrapping the hair ends around the knot and securing with bobby pins. Mastering this deceptively easy technique makes achieving a polished bow look simple enough for any hair length or type.
Getting Started with a Bow Tie Hairstyle
Gather the hair you want for your bow tie at the nape of your neck. Make sure to pick up just enough hair so it easily forms the bow shape. Split this hair into two even sections by directly parting it down the middle. Now cross one section over the other to create an X formation with the hair strands.
Twist both sections of hair away from your face to start forming the knot. Slowly rotate the strands in your fingers until they curl in on themselves. Continue twisting until a loose bow starts to take its shape. The twisting action shapes the hair directly into the bow instead of waiting for it to form.
Gathering the Hair at the Nape
Gather a small section of hair at the back of your neck where the bow will sit nicely. You want just enough hair to twist and shape into the bow, so collect only what you need. Make sure to grab the hair directly with your fingers instead of letting it gather itself. Test that the amount feels right before splitting it.
The nape area provides a smooth surface to anchor the bow without bulk. Place your fingers at your hairline and gently lift strands from below. Directly pick out the hairs you want rather than waiting for them to fall into your hand. Check that you have the right quantity by seeing if it sits fully behind your neck without extra length.
Splitting the Hair into Two Sections
Once you have the hair gathered at the nape, divide it directly into two equal parts. Use your fingers to part the hair down the centre with equal piles on either side. Check that both halves appear similar in thickness and texture. Separate each section cleanly so you can work with crisp sections.
Cross your hands to double check the split is even. Tweak the separation directly if one portion is thicker or thinner. Run your fingers along the parting to ensure it is clearly defined up to the roots. Cleanly dividing the hair makes the Bow form symmetrically instead of lopsided.
Crossing One Section Over the Other
Take one section of hair and lift it over towards the other half. Directly move the strand across the parted line to an overlapping position on top. This will cause the sections to form an X shape across the back of the head.
Check that both sides meet neatly in the centre without skewing to one side. Adjust the crossover by sliding strands if it sits unevenly. Forming the X by actively positioning one half aids in keeping the sections balanced. The application of direct crossing lays the groundwork for properly twisting the hair.
Twisting the Hair Away from the Face
Grab the two crossed sections of hair close to the roots. Slowly rotate both strands away from your forehead at the same time. Actively turn the hair around each other with steady motions away from your face.
Keep twisting until the strands begin to wrap tight. Check frequently that the hair is coiling evenly on both sides. Continue direct rotation with your fingers to shape the hair into position. The manual twisting directly sculpts the hair into the proper form for the bow.
Continuing the Twist into a Knot
As you twist the hair sections further, they will start to knot up at the base. Keep direct rotational pressure on the strands with your fingers to encourage this. Watch as the twists tighten naturally into a neat loop shape.
Maintain contact on the hair and never let the twist slip out. Ensure any loose strands get folded into the thickening knot. Continue coiling until pleased with how dense and rounded it appears. Formation of the knot is key as it forms the anchor for your finished bow.
Wrapping the Ends to Form the Bow Shape

Once the hair knot is complete, begin wrapping the outside pieces around it. Grasp the loose ends and manually wind them together over the twists underneath.
Wrap the strands carefully but loosely so the bow takes on volume. Coil each piece in a circular motion until they meet in the middle of the knot. Keep fingertips on the hair to guide it into a neat, balanced bow. Direct wrapping makes the finished product crisp and polished.
Holding It All Together with Bobby Pins
To secure the freshly made bow, gather bobby pins. Reach underneath the hair formation with pins in hand. Gently but firmly insert pins vertically through the wrapped strands and knot.
Place pins where hair clusters thickest to anchor spots. Slide two or more pins directly through kinks for sturdiness. Check that hair doesn’t shift after fastening with pins inserted by your fingers. The bobby pins actively hold the style until you remove them.
Fluffing Out the Bow for Style and Volume
Once pinned securely in place, fluff out the bow shape with your fingertips. Run fingers gently along each curve and twist spread strands and add body.
Give the sections separation and lift using direct finger motions. Create a billowed effect around the knotted middle. Work any pin-flattened pieces back to the desired form. Your digits sculpt the finished bow to ideal fullness and structure.
Achieving the Polished Look Without a Real Tie
By following the simple steps, you can fashion a faux bow tie in your hair. The twists and wraps artfully shape strands to mimic an elegant silk or satin tie.
“Rather than needing an actual bow tie that ties around the neck, this hairstyle with short hair recreates the appearance. Your skilled hands direct each element until achieving a dapper style. The polished result fools the eye without extra accessories.”
Dealing with Shorter or Longer Lengths of Hair
For shorter styles, gather more hair to work with. Also try a smaller bow size to fit. Ensure secure pins don’t show above shorter layers cut.
Longer lengths allow playing with various versions. Curl ends under for bob effect or braid before forming bow. Directly experiment holding different sections to suit length. Finding techniques to actively work with your hair type makes any style possible.
Choosing Hair Accessories for Extra Pzazz
Spruce up basic bows by including hair accessories. Pin on jewelled or velvet pins near sides of bow for sparkle. Add a decorative clip above the knot or thin woven headband under the bow.
| Hair Accessory | Description | How to Use | |
| Rhinestone Pins | Small pins decorated with glittering gemstones. | Pin into hair near the sides or front of the bow for a subtle sparkle. | |
| Velvet Bows | Small hair accessories made of plush velvet fabric. | Place mini velvet bow above or below the bow tie shape. | |
| Flowers | Fresh or fake flowers like roses or daisies. | Tuck a small flower behind an ear or at the base of the bow. | |
| Headbands | Thin woven or beaded bands worn across the forehead. | Wear under the bow tie for an embellished look. | |
| Clips | Decorative clips in a variety of shapes, colours and designs. | Add a clip above or below the bow to draw attention to the style. | |
| Barrettes | Classic claw or slide barrettes decorated with stones, pearls or patterns. | Used to pull back side pieces underneath the bow. |
This table provides examples of common hair accessories that can be used to glam up a basic bow tie hairstyle and give it some extra pzazz. It describes each type of accessory and offers suggestions on how to incorporate it into the hairstyle.
Products to Help Tame Flyaway
For finishing the look, apply a light hair spray. Spritz a small amount around the bow shape from a distance. Let spray dry before fluffing with your fingers.
Also use a dime sized dollop of cream or gel on your palms. Rub hands together then smooth product onto any frizzy hairs standing up. Your directly applied moisturiser calms flyaways without weight.
Troubleshooting Common Bow Hairstyle Issues
If the bow sits crooked, tweeze a few hairs on the heavy side before repinning straight. To fix lopsided twists, hand twist sections in opposite rotation.
For a bow that flops, try a smaller section of hair or extra pins hidden on the underside. Gently pull loose pieces back into place instead of redoing entirely. Directly correct small flaws for a polished finished look.
FAQs
How to make a bow with natural hair?
To make a bow with natural hair, gather sections and twist them around each other to form the signature bow shape. Secure with bobby pins or hair clips.
Are hair bows in style?
Yes, hair bows are still currently in style, especially among younger women and girls. The bow is a classic hair accessory.
What looks like a bow in the sky?
A rainbow that appears curved or arched across the sky resembles a bow. Its glowing colorful bands of moisture in the atmosphere forms a bow-like shape.
What is rainbow bow shaped?
Rainbows are sometimes described as being bow-shaped since the arc of colors looks similar to the way a bow is formed with two end pieces wrapped around a center knot.
Conclusion
Mastering the bow tie hairstyle provides a stylish hairdo option. By following the simple steps explained, anyone can learn to fashion this look. Practising the techniques of gathering, splitting, twisting and securing will lead to impressive results. With some trial and error, the process becomes easier each time.
How to do a bow tie hairstyle may seem daunting at first but breaking it down into smaller steps helps. Being willing to try different methods for your hair type and length helps achieve the best finished bow. Referring back to tutorials when needed keeps the look polished. With some training of your hands and patience, you’ll be an expert at this classic udo in no time.